
by Deborah Healey
We all know the motivation that can be engendered by letting students be creative while learning. It's why role-plays can be both fun and powerful tools. This month's Tech Tip is about one of my favorite tools for learner creativity: Hollywood from Tom Snyder Productions. It is, conservatively speaking, one of the most fun pieces of software I've ever used. If it fits in your curriculum -- and it won't fit everywhere -- I heartily recommend it. It's also very reasonably priced at around $40 mail order (lab packs are available).
Hollywood is a CD-ROM that runs on Windows and Macintosh and turns students into Hollywood producers. You create animated movies complete with a cast of zany characters, odd sets, wierd voices, animated actions, and sound effects. It's like a high-tech puppet show on a computer screen. (There is a second product, Hollywood High, that has more high school settings and teen-like characters than the original Hollywood. Both work the same way, however.)
The fun factor is in the creativity Hollywood enables. The language learning is in the fact that students need to choose from actions and emotions for their characters and create dialogue -- the synthetic speech and highly irregular voices are part of the fun in playing one's opus back.
Start out by giving students a general idea about the program -- that it lets them create a Hollywood story (but with just one set). You might have them imagine different settings and possible plots, or use some of the built-in story starters. They can brainstorm dialogue off the computer, too, to get some creative juices flowing.
To begin a production, students choose from a range of settings --
from the interior of a space ship to a ball game to a TV studio to a
dinner party (and more). A few of the settings are shown below. They
then pick a character, some of whom are shown below. 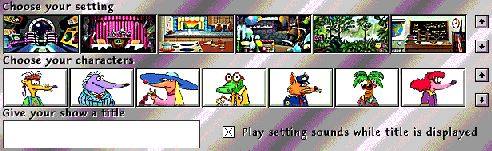
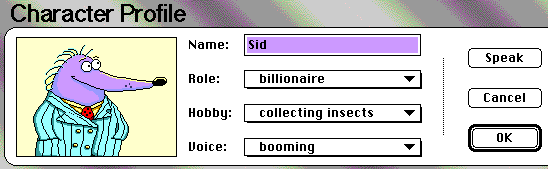 A
sample character profile is shown here. The student can type in a
name of his or her choice (be prepared-- the teacher is often
lampooned in these productions). Next is the choice of
role/profession, hobby, and type of voice.
A
sample character profile is shown here. The student can type in a
name of his or her choice (be prepared-- the teacher is often
lampooned in these productions). Next is the choice of
role/profession, hobby, and type of voice.
Just going through the list of roles and hobbies provides a wealth of language learning data. I have students look up the ones they don't recognize and explain them to the rest. If your students have very limited proficiency, you may want to provide some suggestions for role, hobby, and voice choices.
The voices are all synthesized rather than digitized, so none are in any way usable as models of English use -- but that's not their purpose. Depending on the students, it's often "the wierder, the better" (read "more motivating"). This is a writing and discussion exercise, not a listening one.
There are no human characters, only animal, plant, and unknown types. This avoids the issue of whose ethnic group is being represented. The personalities, though, are easily recognizable among one's friends, classmates, and teachers. Depending on your group, you may want to think about whether or not it's a good idea for students to use the names of their classmates in their productions.
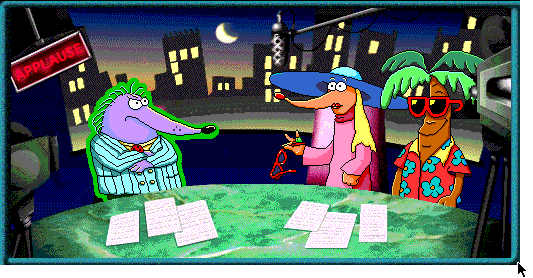
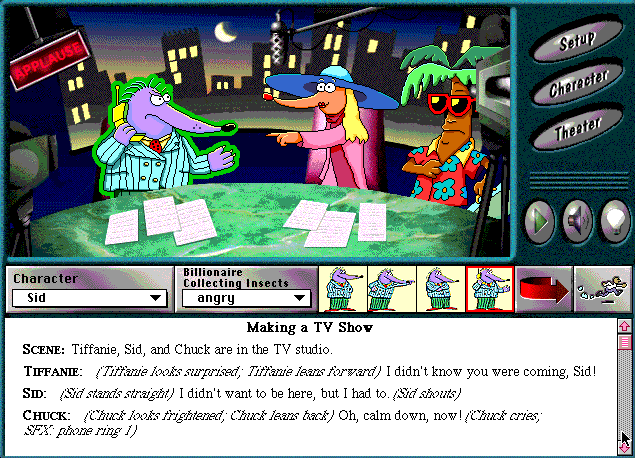
Let's look at a sample episode. Say students have chosen the TV
studio setting and characters "Sid," "Tiffanie," and "Chuck."
Students can now choose from a range of actions for their characters.
For example, clicking on "Sid" highlights him and makes the actions
chosen apply to him. 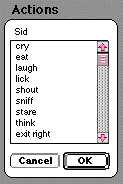
Clicking on the actions icon brings up a scrolling list. Selecting an action causes the character to perform it and adds it to the screenplay. Different characters have different actions -- Chuck (the palm tree) has the option of sipping from a coconut that Sid doesn't have.
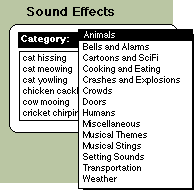
Students can add dialogue for Sid, choose another action, or click on another character to add action and dialogue. Once the plot begins to develop (or whenever they feel like it, for that matter), students can choose sound effects to add to the production. The array of sound effects is impressive, with categories from Animals to Weather. Each category has a wealth of choices, all of which students can experiment with and learn vocabulary from.
The number of sound effects possible depends entirely on the artistic license you wish to allow and your tolerance for random noise in the process of creating a show.
Finally, students will have put together a complete production. I've found that the first creation is a mishmash of ideas, sounds, and characters -- exploratory learning at its best -- but that once students see what the software can do, you can expect more plot and meaningful dialogue. A sample first scene is shown below.
One caveat with Hollywood -- save often! Extensive editing can cause the software to crash, so it's much better if students can plan ahead before adding and deleting actions and sound effects.
After the production is finished, students can select the "Theater" button to show it in its entirety. This is where a high-quality projector really shines. Lacking that, have students cluster around different computers and view each other's work. Be prepared for a lot of laughter!
If you have questions, comments, or for more information,
contact Deborah Healey, dhealey AT uoregon DOT edu
https://www.deborahhealey.com/techtips/nov1998.html
Last
updated 26 June, 2009